Spalling brick is one of the more common, and more misunderstood, masonry problems on older Toronto homes. It looks like the face of the brick is flaking, crumbling, or breaking away in layers. It’s easy to notice once it’s advanced, but by that point the damage has usually been building for several years. Understanding what causes spalling, how to recognize it early, and what repairs actually fix the problem will help you make better decisions about your exterior masonry.
This guide covers the full picture: what spalling is, why it happens, what it costs to repair, and when spot repair is sufficient versus when a larger scope makes more sense.
What Is Spalling Brick?
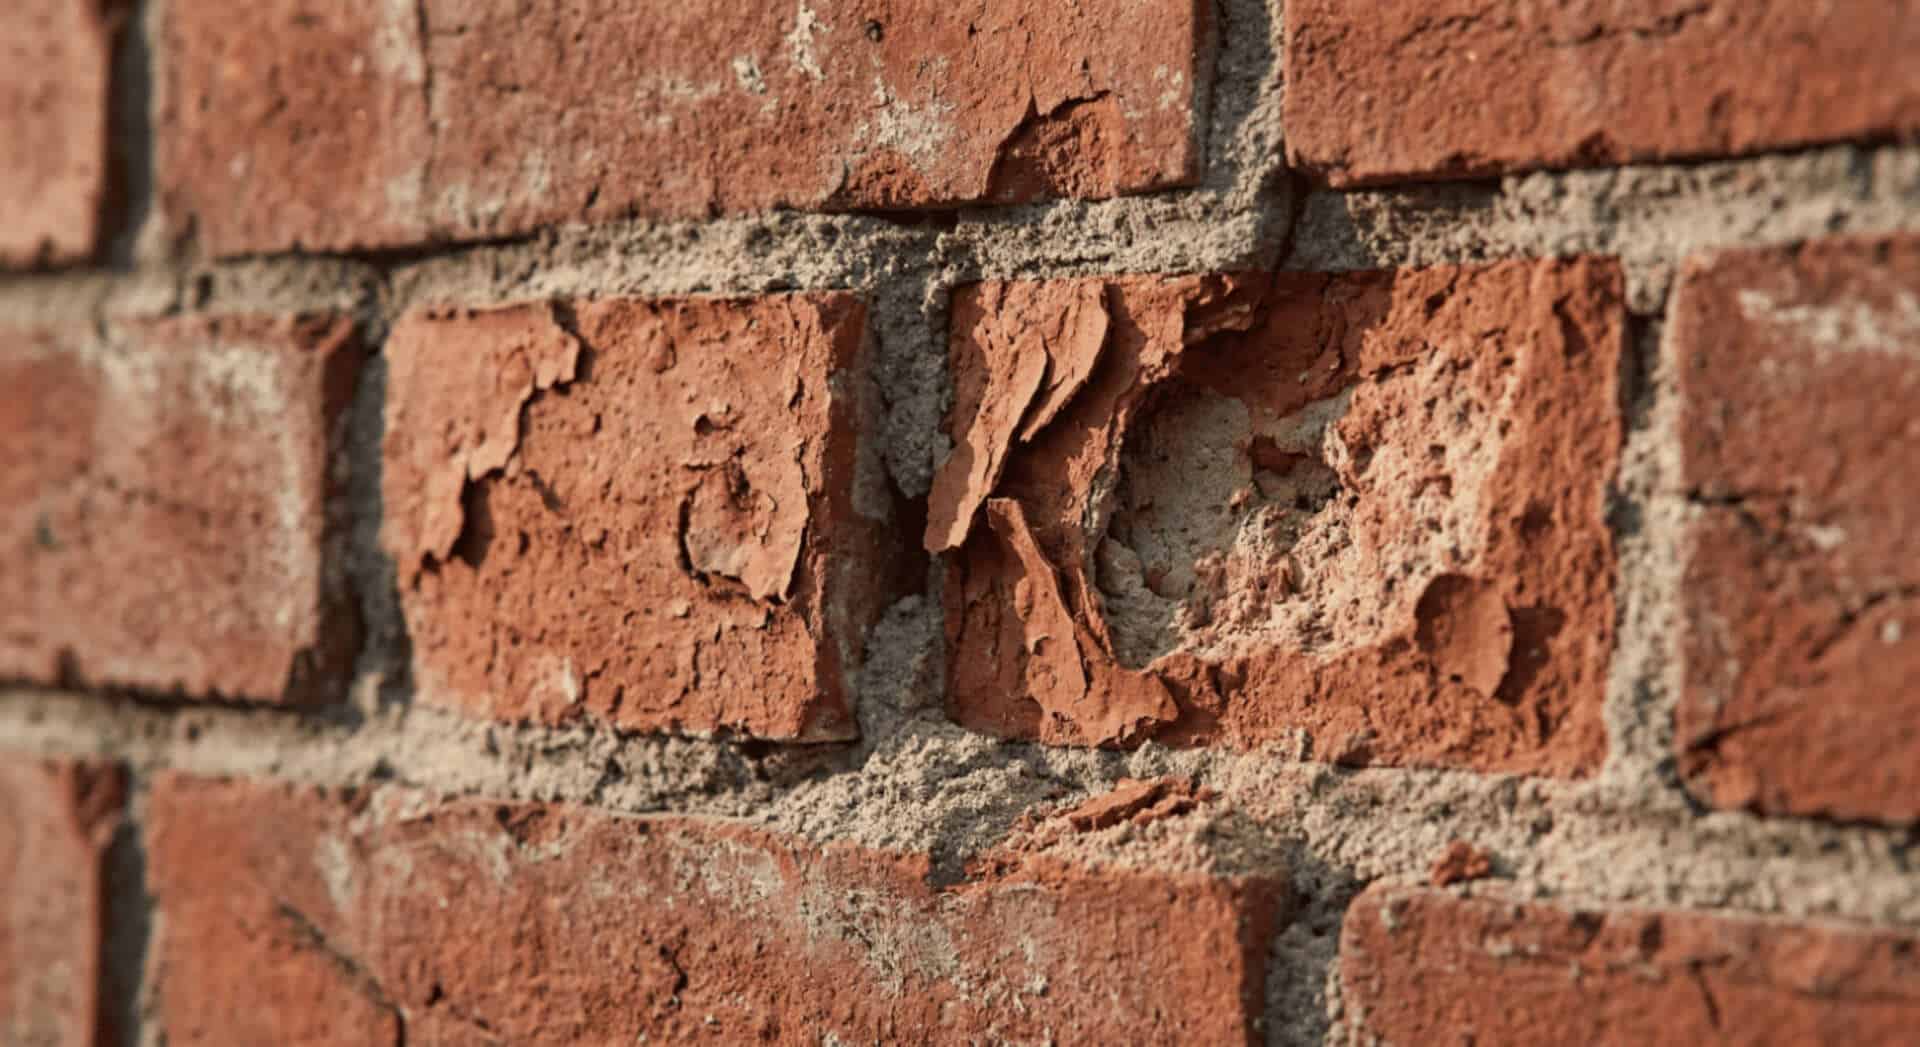
Spalling refers to the fracturing or flaking of the outer face of a brick. The surface layer separates from the body of the brick, sometimes peeling away in thin sheets, sometimes breaking off in larger chunks. What’s left behind is a rough, pitted, or recessed surface that’s structurally weaker than intact brick and significantly more vulnerable to further moisture intrusion.
Spalling is not a surface problem. By the time it’s visible, the brick itself has been compromised. That’s the critical thing to understand: treating the surface without addressing what caused the spalling will not produce a lasting repair.
What Causes Spalling Brick?
Moisture is the root cause of nearly every spalling problem. The mechanism is straightforward. Water penetrates the brick, either through the face of the brick itself, through failing mortar joints, or from above through a damaged coping or crown. Once inside the brick, that moisture freezes and expands when temperatures drop below zero. The expansion generates pressure from within the brick that the outer layer can’t withstand. Over repeated freeze-thaw cycles, the face fractures and eventually separates.
Toronto’s climate makes this process particularly active. The city sees 30 to 40 freeze-thaw cycles in a typical winter, with the worst damage occurring during the shoulder seasons when temperatures fluctuate above and below zero repeatedly in short spans. A brick that has absorbed moisture in late October can experience significant internal stress before December.
Failing Mortar Joints
Mortar is the primary entry point for water in most cases of spalling. When mortar joints crack, shrink, or erode, they create open pathways for water to move into the wall. Once water is in the joint, it can migrate into the adjacent brick. Mortar typically begins to fail in earnest after 20 to 30 years, which is why spalling is common on Toronto homes built in the 1950s through 1980s that haven’t had maintenance work done.
Improper Mortar Repairs
One of the less obvious causes of spalling is a previous repair done with the wrong mortar mix. Modern Portland cement mortars are significantly harder than the soft lime mortars used in older construction. When a hard mortar is applied to a wall built with soft brick, the mortar doesn’t flex with the brick through thermal movement. Instead, stress is transferred directly into the brick face, which cracks and spalls over time. This is a known problem in Toronto’s older housing stock, where well-intentioned repointing done with modern pre-mix mortar has actually accelerated brick damage.
Brick Quality and Age
Not all brick is equally dense or equally resistant to water absorption. Older handmade brick, common in Toronto homes built before the Second World War, is often softer and more porous than modern machine-pressed brick. It’s also more sensitive to incompatible mortar. That doesn’t mean it’s inferior. It means it requires repairs done with materials matched to its properties.
Improper Drainage and Grade
Water that pools against a foundation wall or that splashes repeatedly against exterior brick from an overloaded downspout will saturate the masonry far faster than rain alone. Soil graded toward the house, missing or damaged downspout extensions, and planters installed flush against brick walls all contribute to chronic moisture exposure that accelerates spalling.
Moisture Trapped Behind Paint or Sealers
Painting brick or applying a non-breathable sealer traps moisture inside the wall rather than allowing it to evaporate. When that moisture freezes, it has nowhere to go but outward through the brick face. Painted brick that’s beginning to bubble or peel is often a warning sign that spalling is developing beneath the surface.
Warning Signs of Spalling Brick
Spalling doesn’t appear overnight. There’s usually a progression of symptoms that precede visible brick face failure. Catching the problem at an earlier stage means a less invasive and less expensive repair.
Early Warning Signs
- Hairline cracks running along the face of individual bricks
- Mortar joints that are visibly recessed, crumbly, or hollow-sounding when tapped
- White staining (efflorescence) on the brick surface, indicating moisture moving through the wall
- Paint or sealer that is bubbling, peeling, or lifting off the brick face
- Brick that sounds hollow when tapped rather than solid
Active Spalling
- Visible flaking or layering on the brick face
- Chunks of brick material on the ground below a wall or chimney
- Bricks with a noticeably pitted, rough, or recessed surface compared to surrounding brick
- Brick face that crumbles when pressed
If you’re finding brick material on the ground around your home’s foundation or below the chimney, that’s a clear sign spalling is active and getting worse. That’s the point where an inspection should happen before the next winter season.
How to Fix Spalling Brick
The appropriate repair depends on how many bricks are affected, the underlying cause of the moisture intrusion, and the age and type of brick involved. There is no single fix that applies to every case.
Step 1: Address the Moisture Source
Replacing spalled brick without fixing what caused the moisture problem is a temporary solution. Before any masonry repair begins, the source of water entry needs to be identified and corrected. That might mean repointing failing mortar joints, repairing a damaged coping or chimney crown, correcting grade around the foundation, or extending downspouts away from the wall. Skipping this step means the replacement brick will eventually spall for the same reason as the original.
Step 2: Remove and Replace Damaged Bricks
Individual spalled bricks are carefully cut out of the wall using a grinder and chisel, preserving the surrounding masonry as much as possible. Replacement brick is sourced to match the original as closely as possible in size, colour, and texture. On older Toronto homes, this often involves sourcing salvaged brick or working with suppliers who carry heritage-compatible materials.
The replacement brick is set in mortar that is appropriate for the age and hardness of the surrounding wall, not simply the easiest or most available mix. This is a detail that separates competent repair from repair that creates new problems. Our brick repair and restoration work accounts for material compatibility as a standard part of every project.
Step 3: Repoint the Surrounding Joints
Even when only a handful of bricks need replacement, the mortar joints in the surrounding area typically need attention. Failing mortar is usually what allowed moisture in to begin with, and addressing only the visible brick without the joints around it leaves the repair exposed to the same process that created the original damage.
Repointing brick mortar in the repair zone is standard practice, not an upsell. The additional cost is modest relative to what it adds in protection and longevity.
Step 4: Apply a Breathable Masonry Sealer (When Appropriate)
After repairs are complete and mortar has cured, a penetrating masonry sealer can be applied to repel water without trapping vapour inside the wall. The key word is penetrating: a breathable sealer that soaks into the brick surface rather than forming a film over it. Film-forming coatings and paints create the moisture-trapping problem described earlier. A quality penetrating sealer, applied correctly, adds meaningful protection and is part of our masonry waterproofing services when included in a repair scope.
Spalling Brick Repair Costs in Toronto
Cost depends on how many bricks need replacement, how accessible the area is, and whether repointing of surrounding joints is included in the scope.
- Individual brick replacement: $40 to $80 per brick, including matching and labour
- Small section repair (5 to 15 bricks): $500 to $1,500
- Moderate section (15 to 40 bricks): $1,200 to $3,000
- Extensive spalling requiring partial wall replacement: $3,000 to $8,000+
Chimney spalling, which requires scaffolding or lift access, typically costs 20 to 30 percent more than equivalent work at ground level due to the setup involved.
When Spot Repair Is Enough and When It Isn’t
Spot repair works well when spalling is genuinely isolated: a few bricks in a specific location with a clear, correctable cause. Replace the damaged bricks, address the moisture entry point, repoint the surrounding joints, and the repair holds.
Spot repair is not the right approach when spalling is distributed across a significant portion of a wall. Replacing individual bricks scattered through a large area produces a patchy, inconsistent result that is also more likely to continue failing because the underlying mortar condition is not being addressed systematically. In those cases, a broader repointing and restoration scope, treating the full section rather than individual bricks, produces better results at a better overall value.
Our brickwork services include full assessments before any work begins, so we can give you a straight answer on which approach makes sense for your specific situation.
Can Spalling Brick Be Prevented?
Not entirely. All masonry weathers over time. But the rate of deterioration is substantially within your control. The most effective prevention measures are:
- Keeping mortar joints maintained before they open up enough to allow water entry
- Ensuring downspouts and drainage are directing water away from exterior walls
- Keeping soil and plantings graded away from the foundation
- Avoiding the application of paint or non-breathable coatings to exterior brick
- Having chimney crowns and copings inspected after harsh winters
A home with well-maintained mortar and proper drainage around it will experience far less spalling than a comparable home where both have been neglected. The maintenance cost is almost always less than the repair cost it prevents.
Frequently Asked Questions About Spalling Brick Repair
Is spalling brick structurally dangerous?
It depends on the location and extent. Widespread spalling on a load-bearing wall or chimney is a structural concern and warrants prompt assessment. Isolated spalling on a decorative or non-load-bearing section is less immediately serious but will worsen if left unaddressed. Any spalling on a chimney should be evaluated before the next heating season, as loose brick at height is a safety hazard.
Can you fill spalled brick with mortar instead of replacing it?
Filling a spalled brick face with mortar is not a reliable repair. The mortar will not bond properly to a compromised brick face, and it doesn’t address the structural weakness left behind when the original face material is gone. Filled repairs typically fail within one or two seasons. The correct approach for a significantly spalled brick is removal and replacement.
Will spalling stop on its own?
No. Spalling is a progressive condition. Once the face of a brick has fractured, the exposed interior is softer and more porous than the original surface, making it even more susceptible to further moisture penetration and freeze-thaw damage. Without repair, spalling bricks continue to deteriorate and the problem spreads to adjacent masonry over time.
How long does spalling brick repair last?
A properly executed repair, with compatible mortar, correct brick matching, and the moisture source addressed, should last 20 to 30 years or more. Repairs that skip any of those steps will fail sooner. The quality of the mortar mix, the depth of joint preparation, and how the underlying cause was handled all determine how long the work holds up.
Does spalling brick affect home resale value?
Yes, meaningfully. Visible spalling on exterior brick raises flags for buyers and home inspectors. It signals deferred maintenance and prompts questions about what else may have been neglected. Addressing spalling before listing removes an objection from the inspection report and presents the home’s exterior in better condition. For homes with significant brick, the repair investment is generally recovered in the sale.
How do I know if my mortar is the right type for my brick?
Most homeowners don’t, and don’t need to. A mason who works with heritage and older residential brick regularly will assess the existing mortar and brick hardness before selecting a repair mix. What you can do is ask the question before work begins and make sure you get a direct answer about what mortar type will be used and why it’s appropriate for your wall. If a contractor can’t answer that clearly, that tells you something. You’re welcome to request a free estimate from our team and ask us directly during the site visit.